

Configure USB networking
USB networking configuration can be enabled by the pc-connectivity applets or manually. There are currently one control panel applet called "network-manager" and a status bar applet called "connection-switcher". The network-manager can be used to setup the connection attributes, such as IP addresses, netmask, etc. Once these values are set, both network-manager and connection-switcher can be easily used to enable and disable the connection.Installation
Install maemo-pc-connectivity package on tablet and host-pc-connectivity package in your host PC (Linux) as described [here].
Setup USB Network in the Tablet
When the Tablet is turned on, its USB connection is configured as "mass storage" access by default. If you plug the USB cable, the memory cards from the Tablet will be visible on your host PC. To enable USB networking use the new "network-manager" applet (installed to the Tablet by the maemo-pc-connectivity meta package):
Follow these steps whenever you want to set up USB networking:
- Disconnect the USB cable
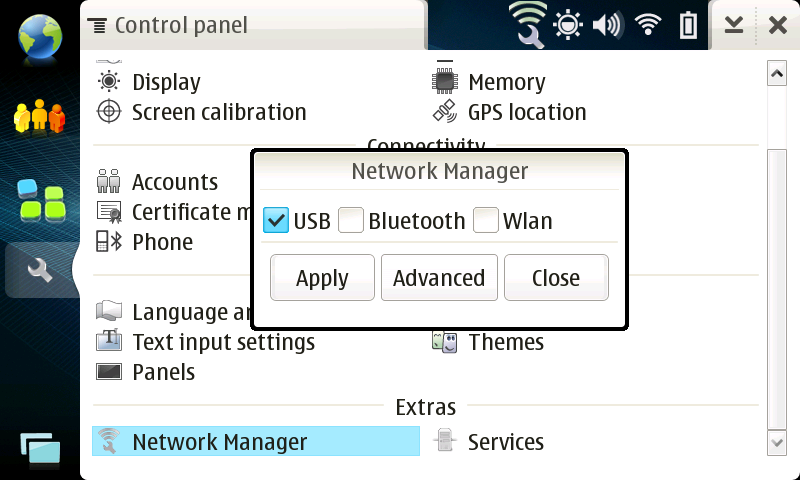
Run Settings > Control Panel > Extras > Network Manager
-
Select “USB“ option as shown in the next picture and press "Apply"
- The tablet USB mode will be switched to USB networking, and it will set these values by default:
- IP address: 192.168.2.15
- Gateway: 192.168.2.14
- Netmask: 255.255.255.0
- Now, connect the USB cable on the host PC
If you want to change these values, press the "Advanced" button. The application will change to advanced mode:
-
Setup the network options, such as IP address

-
Change the values as you desire and click on the "Apply" button
Fast USB Networking setup
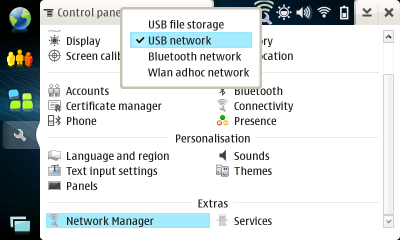
Once you have setup the "USB network" options from network-manager, or if the default values are ok for you, just use the new connection-switcher applet from status bar to enable or disable the usb network:
Setup USB Network on Windows
To configure USB networking on Windows it is a bit more complicated because the original Linux kernel for maemo (Diablo) needs to be replaced by a new image that fix some USB Networking issues.1. Flash new Kernel on the device with Windows USB Networking fixed. Follow the next steps on a Linux machine:
-
Download the file diablo_kernel_usbnet_windows.tar.gz from [here].
-
Decompress the file: tar zxf diablo_kernel_usbnet_windows.tar.gz
-
Flash the zImage file using the flasher application: ./flasher-3.0 -k diablo_kernel_usbnet_windows/zImage -f -R
-
The device is ready to be used in windows: When connecting the USB to Windows PC, use the .inf file when windows requests the new hardware driver
- Enable Usb Networking on the device using "network-manager" applet as described before
Plug the device and Windows will detect the new device
-
In the dialogs for 'Found New Hardware Wizard' proceed as following:
-
Select option "No, not this time", click on the button "next"
-
Select option 'Install from a list or specific location (Advanced)', click on the button 'next'
-
Select option 'Don't search, I will choose the driver to install', click on the button 'next'
-
Select option 'Network adapters', click on the button 'next'; (optional screen)
-
Select option 'Have disk' and then click on 'Browser' button and select the .inf file and click on the button 'OK'
-
Follow the next steps as a normal driver installation
-
-
The new USB Network Interface will be available at Start Menu->Network Connections
-
Setup the network as: IP address 192.168.2.14, Netwmask 255.255.255.0
-
Go to the prompt and type 'ping 192.168.2.15' to check if the connection is OK
Manual installation
After the maemo PC connectivity components have been installed on the Tablet and host PC (maemo-pc-connectivity and host-pc-connectivity, respectivily), the following steps are executed automatically. But, for those that would like to adapt the steps or execute them on their own, this document explains the steps to have USB Networking configure to communicate between the Tablet and the host PC manually.
Tablet setup
After installing the maemo-pc-connectivity meta package, the Tablet will be configured like this:
-
When USB networking is enabled, the "g_ether.ko" module will be loaded
-
The "usb0" interface will be configured for the static device address 192.168.2.15 and host address 192.168.2.14.
If you need to use different addresses, perhaps due to a conflict with a LAN, edit "/etc/network/interfaces" on the Tablet and substitute appropriate values in the remainder of the document.
Host PC setup
After installing the host-pc-connectivity package, the Host will be configured like this:On your Ubuntu host PC you need to edit "/etc/udev/rules.d/85-ifupdown.rules" file and change following line
- SUBSYSTEM=="net", DRIVERS=="?*", GOTO="net_start"
to this line
- SUBSYSTEM=="net", GOTO="net_start"
For Debian this change is not needed. For Ubuntu if this workaround is not done and USB cable will be unplugged and plugged back to Tablet, the usb0 network interface will not get its IP address back and network needs to be restarted with "/etc/init.d/networking restart". This is a bug in Ubuntu (related bug report is here ).
On your Ubuntu or Debian host PC, set up your network interfaces so that the USB network will be routed properly:
-
Edit the network interface configuration in the host's "/etc/network/interfaces" file and add the lines bellow, if not already present:
    auto usb0
    allow-hotplug usb0

    mapping hotplug
    script grep
    map usb0

    iface usb0 inet static
    address 192.168.2.14
    netmask 255.255.255.0
    network 192.168.2.0
    broadcast 192.168.2.255
    up iptables -t nat -A POSTROUTING -s 192.168.2.15 -j MASQUERADE
    up echo 1 > /proc/sys/net/ipv4/ip_forward
    down iptables -t nat -D POSTROUTING -s 192.168.2.15 -j MASQUERADE
    down echo 0 > /proc/sys/net/ipv4/ip_forward
-
Run Utilities > X Terminal
-
Type "sudo gainroot"
-
Type "insmod /mnt/initfs/lib/modules/2.6.21-omap1/g_ether.ko"
-
Type "ifup usb0"
-
Plug in the USB cable
-
To disable USB network:
-
Type "ifdown usb0"
-
Type "rmmod g_ether"
-
-
If you are in a VMware Linux image:
-
Go to VM > Removable Devices > USB Devices and enable “Netchip Modem”. This setting should be sticky, but will sometimes be reset if you plug in to alternate USB ports.
-
If this hangs VMware, unplug the cable and wait a short time until you get two “device in use” error messages, one from Windows and one from VMware (likely because of automatic USB Mass Storage).
-
Plug in the cable again.
-
-
Invoke "sudo ifdown usb0 ; sudo ifup usb0" . The down/up sequence ensures that the host PC will attempt to reconnect the interface.
-
If this results in a lot of errors that end with "Failed to bring up usb0" , try again a few times – there can be a delay as the host PC and the Tablet become aware of each other. If it doesn't succeed (empty output), you may have to unplug/plug the USB cable again, and/or press “Setup USB networking” in the USB networking applet again.
-
Test the connection: "ping 192.168.2.15"
-
If you get ping times then it is working (use Ctrl-C to exit). Otherwise, try again. This can be an annoying process, especially in VMware where the USB connection may be automatically configured for mass storage every time you plug in the cable. It may even require restarting VMware in some cases.
With this configuration we ensure that "ifup usb0" will set up the same IP addresses that the Tablet side default configuration expects. It also allows the Tablet to access the Internet through the connection. But don't run that command yet – you need to connect cables and set up things in the right order as specified in the following sections.
You can configure USB networking manually n the Tablet:
On the host PC: